Solar PV Cables are core components for any solar PV system and they are seen as the lifeline that connects individual panels to make the system work. The energy generated by the solar panels is transferred to another place which means we need cables to transfer the energy from the solar panels – this is where solar cables come in.
This guide will serve as an introductory guide to 4mm solar cables – solar cables which are the most commonly used alongside 6mm cables. We’ll break down the differences between cables/wires, sizing methods, and 4mm solar cable installation.
Solar Cables Vs. Wires: What’s The Difference?
The terms “wire” and “cable” are assumed to be the same by the public, but there is actually a major difference between the two. A solar panel is a group of multiple conductors while a wire is only a single conductor.
This means that wires are essentially the small components that make up the larger cable. A 4mm solar cable has multiple small wires inside the cable which are used to transfer electricity between different endpoints in the solar setup.
Solar Cables: 4mm Introduction
To understand how 4mm solar cables function, we have to break down to the basic components that make up the cable: Wires.
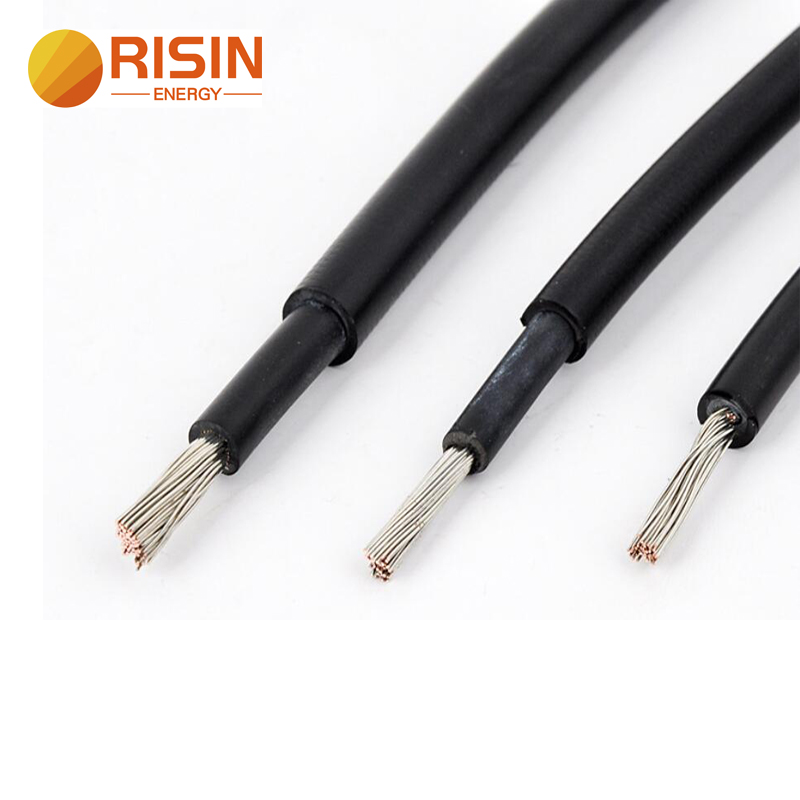
Each wire located inside a 4mm cable works as a conductor and the cable is comprised of multiple such conductors. Solar wires are made from a sturdy material such as copper or aluminum. These materials provide reliable connectivity and the ability to transfer electricity from the solar panels to the home.
There are two types of wires: single wire and stranded wire. A single wire or a solid wire serves as a single conductor inside the cable and the wire is usually insulated by a protective layer in order to protect it from the elements. Single wires are used for basic electric wiring in the home including solar cables. They tend to be a cheaper option compared to stranded wires but they can only be obtained in smaller gauges.
Stranded wires are the big brother of single wires and “stranded” means that the wire is a connection of different wires which are twisted together to form one core wire. Stranded wires are used on solar systems but also have other applications – especially moving vehicles such as cars, trucks, trailers, etc. Stranded wires have the benefit of being thicker and this makes them more resilient to vibrations and the elements, hence they’re more expensive. Most solar cables come with stranded wires.
What is a 4mm Solar Cable?
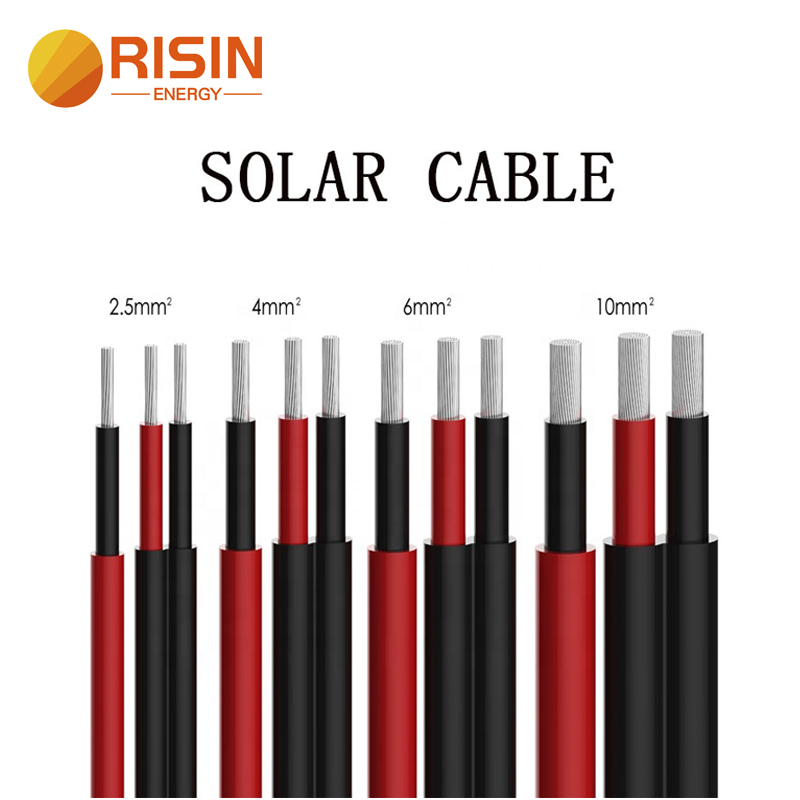
A 4mm solar cable is a 4mm thick cable that contains at least two wires which are enveloped together under one protective cover. Depending on the manufacturer, the 4mm cable may have 4-5 conductor wires inside or it could only have 2 wires. In general, cables are classified based on the total number of wires the gauge. There are different types of solar cables: Solar string cables, solar DC cables, and solar AC cables.
Solar DC Cables
DC cables are the most commonly used cables for solar stringing. This is because DC current is used in households and solar panels.
- There are two popular types of DC cables: Modular DC cables and string DC cables.
Both of these cables can be integrated with your solar PV panels and all you need is a small connector in order to interconnect different DC cables. Below we explain how to connect 4mm solar cables using connectors which can be purchased from any hardware store.
DC Solar Cable: 4mm
The 4mm DC pv cable is one of the most widely-used cables for solar connections. If you want to connect a 4mm solar cable, you basically have to connect the positive and negative cables from the strings directly to the solar power inverter (sometimes called the ‘generator box’). The power output of the modules determines the wire you need. 4mm cables are used while other popular variations such as 6mm solar cables and 2.5mm solar cables are available depending on your needs.
4mm solar cables are mostly used outdoors where strong sunshine shines down on them, which means most of them are UV-resistant. To stay safe from short circuits, the professional has to make sure they don’t connect the positive and negative cables on the same cable.
Even single-wire DC cables are usable and can provide high reliability. In terms of color, you usually have a red (electricity carrying) and blue (negative charge) wire. These wires are surrounded by a thick insulation panel to protect them from heat and rainfall.
It’s possible to connect the solar wire strings to the solar power inverter in numerous ways. The following are the most popular connectivity options:
- The node string method.
- The DC combiner box.
- A direct connection.
- AC connection cable.
If you want to connect using an AC connection cable, you’ll need to use the protective equipment to connect the invertors to the electricity grid. If the solar inverter is a three-phase inverter, most low-voltage connections of this kind are made using five-core AC cables.
The five-core AC cables have 3 wires for 3 different phases that carry the electricity: positive, negative, and neutral. If you have a solar system with a single-phase inverter you’re going to need 3 cables to connect it: live wire, ground wire, and neutral wire. Different countries may have their own regulations in regard to solar connectivity. Double-check to ensure you’re compliant with local country codes.
Preparing for installation: How To Size Solar Cables In A Solar System
Sizing is one of the most critical components when you’re connecting different wires to the PV system. Sizing matters for safety in order to avoid short fuses and overheating when you have a power surge – if the cable can’t handle the extra power, it’s going to explode and this can cause a fire in the solar system. Always go overboard on the cable you need because having an undersized cable means you risk fire and prosecution by the law because it’s illegal in most jurisdictions.
Here are the main factors that determine the required solar cable size:
- The power of the solar panels (i.e. generating capacity – if you have a lot of current, you need a bigger size).
- Distance between the solar panels and the loads (if you have a greater distance between the two, you need higher coverage/size to ensure safe passage).
Cable Cross-Sections For Main Solar Cable
If you connect the solar panel in a series (most popular method), your inverters have to be located as close to the feed-in counter as possible. If the inverters are located further out from the cellar, the length of the solar cable can cause potential losses on the AC and the DC side.
The gist here is to ensure that the electricity generated by the solar panels is able to reach as far as possible without any losses on the solar inverter. Solar cables have a loss resistance if they are in ambient temperature.
The thickness of the cable in the main DC solar cable can have an impact on preventing the loss or keeping the loss at a reasonable level – this is why the thicker the cable, the better off you are. Manufacturers design DC solar cables in a way that the loss is smaller than the peak output of the generator. Solar cables have resistance and the drop of the voltage at this resistance point can be calculated.
How To Find A Quality 4mm Solar Cable
The following are the main factors that determine whether you have a quality 4mm solar cable:
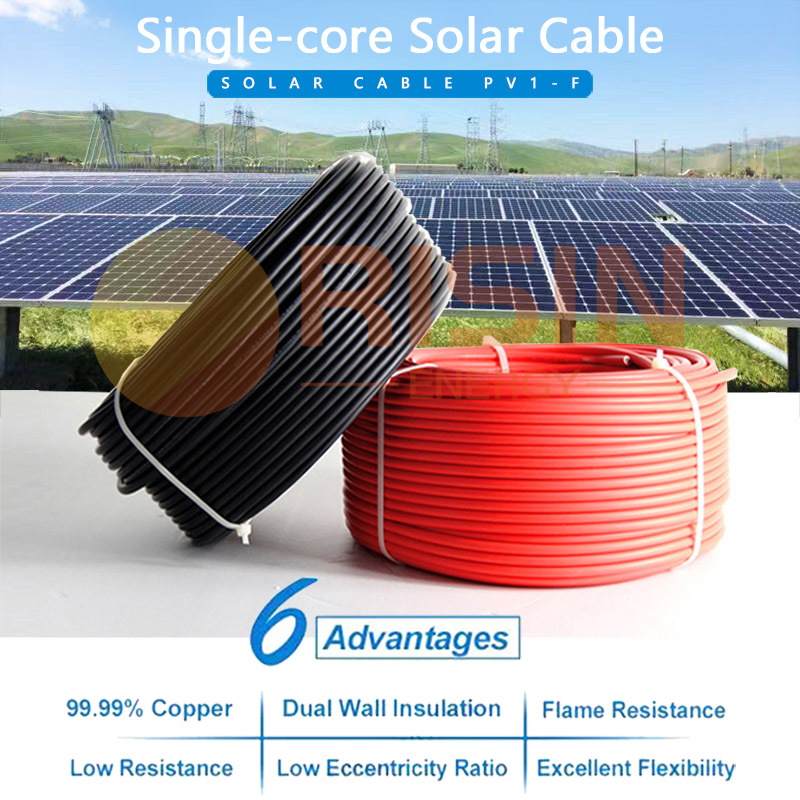
Weather-resistance. The 4mm cable has to be resistant to high temperatures and UV-resistant. Solar cables are used in warm environments and subject to long sun radiation and humidity.
Temperature range. Solar cables should be designed to withstand low temperatures such as -30° and more than +100°.
Sturdy build quality. The cables have to resist bending, tension, and compression upon pressure.
Acid proof and base proof. This will ensure the cable won’t dissolve if it’s exposed to harmful chemicals.
Fire-resistant. If the cable has flame-resisting properties, it will be harder for the fire to spread in the event of a breakdown.
Short-circuit proof. The cable has to be resistant to short-circuits even at higher temperatures.
Protective cover. The additional reinforcement will protect the cable from potential rodents and termites that might chew on it.
How To Connect A 4mm Solar Cable
Welcome to our guide on connecting 4mm solar cables. In order to connect the solar cables, you’re going to need 2 basic tools: A 4mm cable and Solar PV Connector MC4.
Solar wires require connectors in order to connect them at the right spot and the most popular connector type for 4mm solar wires is an MC4 connector.
This connector is used on most newer solar panels and it provides waterproof/dustproof protection for the cables. MC4 connectors are affordable and work ideally with 4mm cables, including 6mm solar cables. If you just purchase a new solar panel you will already have MC4 connectors attached directly which means you won’t have to purchase them on your own.
- Note: MC4 connectors are newer equipment and don’t work with MC3 cables.
The big problem with most solar power systems is that we want to get the electricity from the panels attached on the roof down to another location in the house. The only way to do this is to buy pre-cut leads which range in diameter (usually 10-30 feet), but a better way is to purchase the cable length you need and connect it with MC4 connectors.
As with any other cable, you have male and female connectors on an MC4 cable. You’re going to need basic tools such as the 4mm solar cable, male/female MC4 connectors, wire strippers, wire crimps and about 5-10 minutes of your time to get the job done.
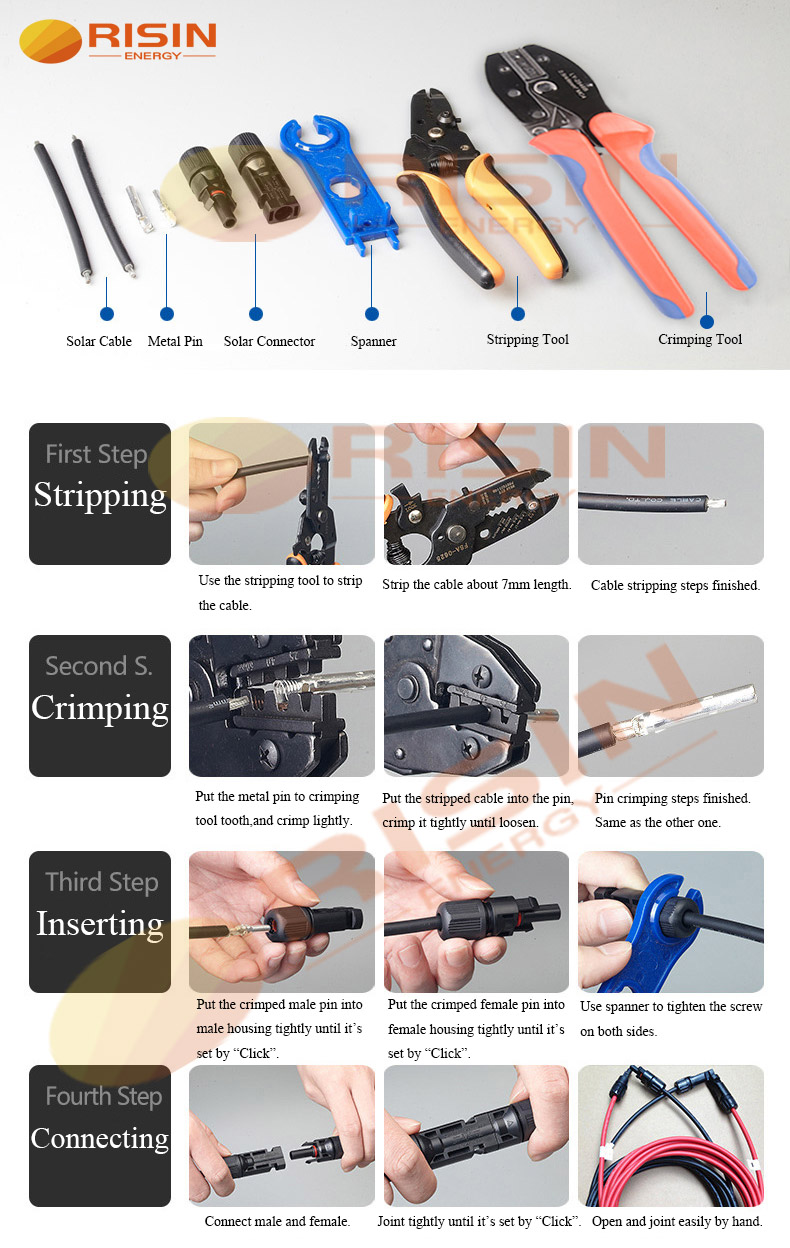
1) Set Up The Connectors
The connector is the most important component because it connects the cables to your solar panel. You first need to place a mark on the metal to indicate how far you want the connector to enter into your existing connector, and if the cable extends past that mark you may not be able to join all MC4 connectors together.
2) Crimp Male Connector
You need a crimp tool for the crimping and we recommend an MC4 4mm crimp connector because it’s going to give you a solid connection and hold the cables together as you’re crimping. Most crimp tools can be had for as little as $40. This is the easy part of the setup process.
Start by passing the screw nut over your metal crimp and then make sure the plastic housing has a non-return clip inside it. If you didn’t put the nut on the cable first, you won’t be able to get the plastic housing off.
3) Insert 4mm Cable
Assuming you’ve crimped the 4mm solar cable right, once you push it in the connector you should hear a “click” sound which indicates you’ve secured it safely. At this stage you want to lock in the cable in the plastic housing.
4) Secure Rubber Washer
You’re going to notice that the seal washer (usually made from rubber) is flush at the end of the cable. This gives a solid grip for a 4mm solar cable once you tighten the nut into the plastic housing. Make sure to tighten it closely, otherwise, the connector may spin around the cable and damage the connection. This completes the connectivity for the male connector.
5) Crimp Female Connector
Take the cable and put a small bend on it to ensure better surface contact within the crimp. You’ll have to strip the cable insulation by a small amount in order to expose the wire for crimping. Crimp the female connector the same as you did the male on in the second step.
6) Connect The Cable
At this stage, you only have to insert the cable. All you need to do is pass the screw nut over the cable and check the rubber washer again. Then you need to push the crimped cable into the female housing. You should hear a “Click” sound here as well and that’s how you’ll know you’ve locked it in place.
7) Test Connectivity
The final state of the connecting process is to test the connectivity. We recommend testing the with the MC4 connectors exclusively before you connect them to the main solar panels or the charge controlled in order to verify everything is working properly. If the connection works, that’s how you’ll verify you’ll have a stable connection for years to come.
Post time: Oct-03-2021